“Step-by-Step Guide: Creating a Registration Form for Your Tech Career Projects”
"Step-by-Step Guide: Creating a Registration Form for Your Tech Career Projects"
Introduction: Importance of a Registration Form in Tech Projects
In today’s digital era, registration forms play a vital role in tech projects and internship training in Coimbatore. They help in collecting user information, tracking event sign-ups, and managing online services effectively. For students and professionals, learning how to build a registration form is an essential skill for web development projects. In this guide, we’ll take you through step-by-step instructions to design a professional registration form that can be used in your tech career projects or internship training.
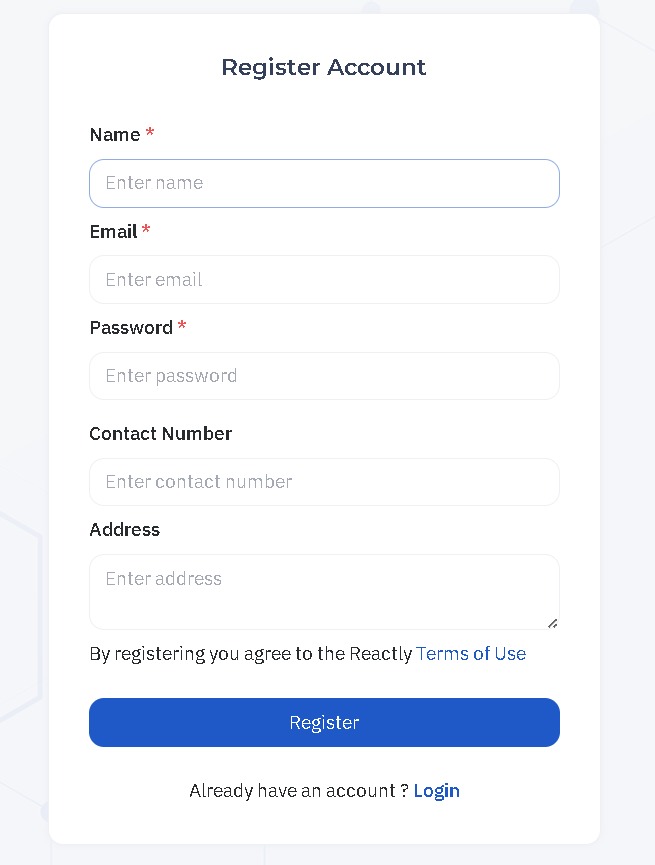
Step 1: Plan the Form’s Purpose and Fields
The first step in building a registration form is defining its purpose. For example, in internship training in Coimbatore, forms can be used for event registration, user sign-up, or student enrollment. Common form fields include:
Name
Email
Phone Number
Password
Always choose fields based on the form’s purpose, keeping the user experience in mind.
Step 2: Set Up the HTML Structure
Use a clean HTML structure to create your form. Below is a simple example:
<form action="/submit" method="post">
  <label for="name">Name:</label>
  <input type="text" id="name" name="name" required><br><br>

  <label for="email">Email:</label>
  <input type="email" id="email" name="email" required><br><br>

  <label for="password">Password:</label>
  <input type="password" id="password" name="password" required><br><br>

  <button type="submit">Register</button>
</form>
Here, the <form> tag defines the registration form, <label> ensures accessibility, and <input> allows users to enter details.
Step 3: Style the Form with CSS
A well-designed form improves usability. Here’s a basic CSS example:
form {
  width: 300px;
  margin: auto;
  padding: 20px;
  border: 1px solid #ccc;
  border-radius: 5px;
}
label {
  display: block;
  margin-bottom: 8px;
}
input[type="text"], input[type="email"], input[type="password"] {
  width: 100%;
  padding: 8px;
  margin-bottom: 10px;
  border: 1px solid #ccc;
  border-radius: 3px;
}
Pro tips: Center your form, add spacing, and style buttons for easy readability.
Step 4: Add Validation for User Input
Validation ensures data accuracy. Use HTML attributes like required and pattern. For advanced validation (like email format or password strength), add JavaScript.
Step 5: Set Up Form Submission with JavaScript or a Server-Side Language
You can either send form data to a backend server or use AJAX with JavaScript. Example:
document.querySelector('form').addEventListener('submit', function(e) {
  e.preventDefault();
  let formData = new FormData(this);
  console.log("Form Submitted", formData.get('name'));
});
In internship training in Coimbatore, students often practice both methods to strengthen their web development skills.
Step 6: Secure the Form and Protect User Data
Security is critical. Always use HTTPS, encrypt passwords, and sanitize inputs to avoid SQL injection or XSS attacks. Frameworks like Node.js, Django, or Flask provide built-in security features.
Step 7: Test the Form for Functionality and Usability
Test your form across multiple devices and browsers to ensure smooth functionality. During internship training in Coimbatore, students are encouraged to gather user feedback for continuous improvements.
Conclusion: Integrate Your Registration Form into Your Tech Project
Creating a registration form is a practical and valuable skill for anyone pursuing a tech career or joining internship training in Coimbatore. From planning and coding to styling and securing the form, each step prepares you for real-world web development challenges. Start applying this skill in your own projects and enhance your career opportunities in tech, UI/UX design, and data collection.